
Getting your Vocals sounding ‘just right’ is perhaps the most important part of your mixing job. The overall quality of your produced Vocals can be the difference between a good project and a great project…
There are no set in stone rules when it comes to putting together a great sounding Vocal mix, but here are a couple of pointers that have really helped keep me on the right track.
Check out the video version of this guide below:
Mix your vocals last
I realize that might sound a little strange, what with this being the first of the four instrument specific guides, but trust me – leaving off fiddling with your vocal tracks till the end of the mixing process will save you time and frustration…
Instead, keep your Vocals in mind as you Compress, EQ and Pan etc. the other tracks in your project. This will make it 100 times easier when it comes time to ‘place’ them in your overall mix.
Don’t mix vocals solo
While it might seem easier at first to solo that Vocal track and work on mixing it without any other instruments or sounds in the way, you’ll undoubtedly run into trouble when you move on to the rest of the tracks in your project.
I won’t lie – learning to mix your Vocals in context with the rest of your project isn’t always easy or fun, but working this way will not only improve the quality of your projects, it’ll make you better at producing and mixing in the long run!

Compression
Applying Compression to a Vocal track is a tricky business. It’s particularly important to know what the purpose of adding Compression to your Vocal actually IS – so before diving in and cranking it up, take the time to listen through your ‘dry’, untouched track a few times…
What do YOU think it needs? What is it lacking?
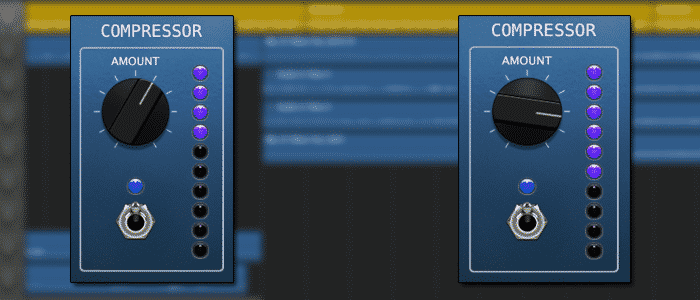
If you plan to use GarageBand’s built in Compressor for your Vocals, you can try out these simple variations to see what sounds good for you.
Remember, these settings are meant as starting points for you to work from, not precise instructions for you to follow – taking the time to experiment with what sounds right for your project is key here…
There’s not much in the way of ‘fine tuning’ available on GarageBand’s default compressor and I find that you have to be quite heavy handed with it to get any half decent sounds.
For lighter compression I found turning it to just over half way (the 1 o’clock position) was sufficient. For more noticeable results, Cranking that wee dial almost the full way round (4 o’clock position) was required.
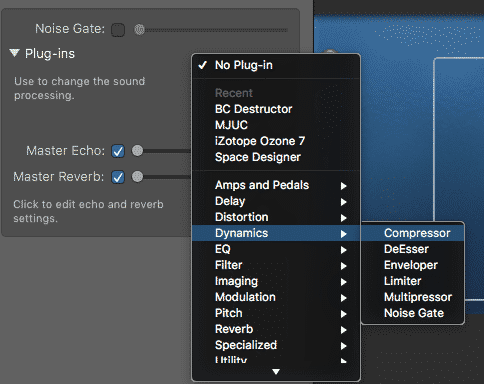
It might be a better idea to make use of GarageBand’s more advanced built in compressor for your vocal tracks – the extra control and flexibility available to you can really help your vocals sound more professional.
Quick reminder; you can find GarageBand’s ‘advanced’ Compressor in the SmartControl’s ‘Plugins’ menu.
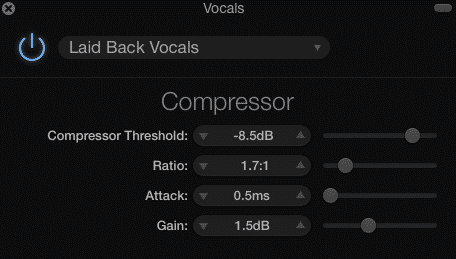
Variation #1 – Laid Back Compression
The aim here is not to squash or really even bring the Vocals to the front of the mix – they’re designed to simply catch the occasional loud changes in frequency (or ‘transients’).
Threshold: -8 to -10 dB 1 ms or less
Ratio: 1:5 – 2:1
Attack: 1 ms or less
Gain: You might need to boost the Gain by 2 – 4dB here, making sure not to have them overpowering the rest of the project. You should be using EQ to make your vocal track cut through the mix, not extra volume!
Variation #2 – PUMP IT UP!!!
Unlike the last ‘recipe’, the purpose of these settings is to really let you hear the compressor at work. It’s designed to bring the Vocal track to the forefront of your mix – take care not to over squash your audio!
Threshold: -2 to -5 dB 1 ms or less
Ratio: 4:1 – 7:1
Attack: 1 ms or less
Gain: You’ll need to add some Gain here to make up for the amount of compression going on. Between 4 – 7 dB should do the trick, but see what works for you!

EQ
In the video below I walk you through step by step how to apply EQ to your vocal tracks.
Before diving in and trying out some EQ settings, it’s important to remember how much effect the way your Vocals were recorded has on their sound.
For example, recording Vocals with a Condenser microphone will result in more top end frequencies being present in the recorded audio than if recorded with a Dynamic microphone. The quality of your recording method plays a big part too – Vocals recorded using the built in microphone on your Mac will sound very different from vocals recorded through a studio quality XLR microphone.
That being said, there is one frequency area you will need to look at regardless of how your Vocals were recorded – the low end. Specifically, anything under 125Hz can – in my opinion – be chucked completely. Down here is where your Kick Drum and Bass frequencies reside – all that you’ll find in the 20 – 125 Hz range of your vocal track is some gnarly sounding hum and irrelevant audio debris. Get rid of it!
Speaking of getting rid of it, i’ve always found that lowering the volume of (or ‘cutting’) of unwanted frequencies gives more natural and clean sounding results than increasing the volume of (or ‘boosting’) frequencies that sound good. At the risk of contradicting myself, boosting some frequencies is perfectly fine, as long as it’s the exception, rather than the rule!
Most other instruments and tracks will have useable frequencies between the 20Hz and 5kHz range, so there will be a lot of different sounds competing to ‘stand out’ from the rest. Make sure your Vocals sit comfortably among everything else that’s going on by creating a wee frequency section just for them (I like the 2kHz to 4kHz range personally). If you keep this in mind when you EQ all your other tracks, even cutting in the ‘Vocals only’ frequency range you’ve created, you’ll find it much easier to keep them at the forefront of your mix!
More so than any other instrument type covered in this guide, EQing Vocals require you to adapt to particular circumstances. There is no one 100% perfect Vocal setting – the best I can do is give you a rough guide to start from – the rest will be up to you!
First,‘roll off’ all frequencies under 100Hz – this is all rumbly nonsense at this range anyway and besides – you really want to keep the 20Hz – 80-100Hz area clear for your Kick Drum and Bass.
Use the Red Hi-Pass cutoff EQ point in GarageBand’s built in EQ window (Get there by opening Smart Controls and clicking on the ‘EQ’ tab) Have a listen back to your Vocal track once you’ve done this and you’ll hear that you’ve lost a lot of boomy low end sound, making it clearer in the mix already!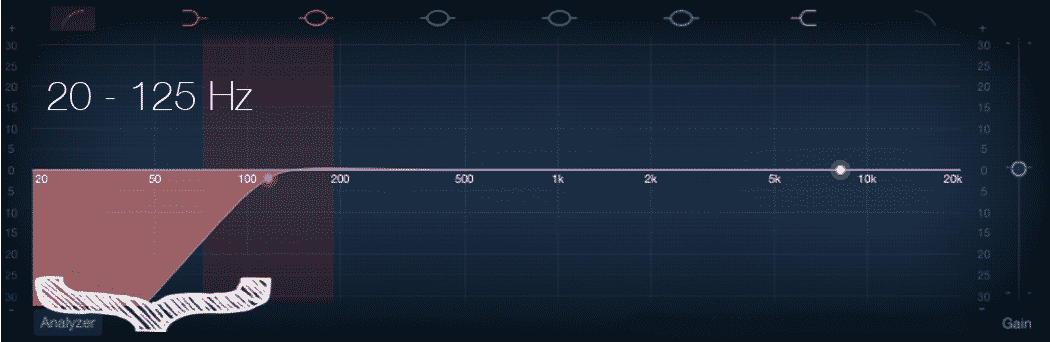
Right next door to our Hi-Pass cut is a small frequency range that can really hold back your Vocals from standing out in your mix. Cutting by 2db – 6db in the 125Hz – 250Hz range will reduce that ‘muddy’, ‘muffled’ sound that will sometimes make your recording sound less than stellar.. This won’t always be the case though and be careful you don’t make your Vocals sound too ‘thin’ here.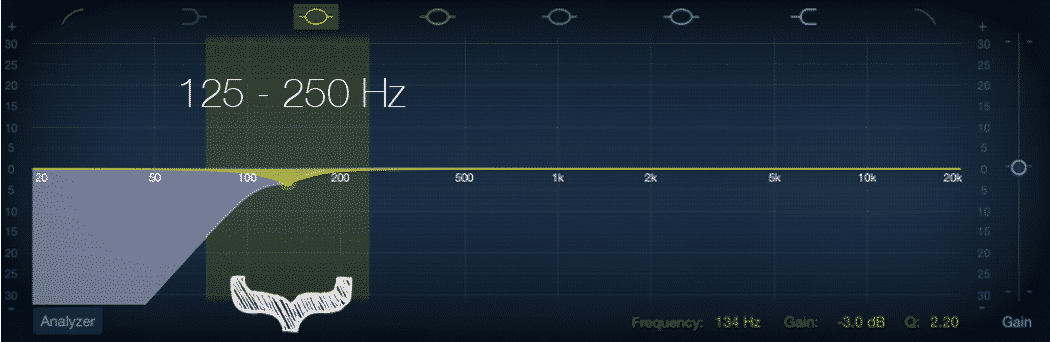
Next up, we need to get a bit creative…. You need to ‘scan’ through the frequencies using one of the EQ points, the purpose of which is to identify any ugly or nasty sounding frequencies in your recording. Literally drag the EQ point up as far as it will go, play back your Vocal track (using the Cycle region on a section will eliminate the need to keep starting and stopping) and drag the point from the 100Hz mark up to the 8kHz point and back again.
Take your time to pinpoint any harsh or ugly sounds – chances are you’ll find them right where I did, slap bang between the 500Hz and 1kHz region. Cutting by around 2db-6db here helps remove that cheap, boomy sound as well as some unneeded mids.
If you want to add a bit of extra sparkle and sheen to your Vocals, use the rightmost ‘shelf’ filter to increase the volume of (or ‘boost’) the frequencies above 8kHz by 2 – 6db. This can help cement your Vocal track as the centre of attention and make the performance sound clearer and cleaner. Be careful not to over do it through, boosting here will also increase the volume of the sibilance in the performance (Sibilance is the unpleasant vocal harshness that you sometimes hear when some syllables are pronounced (S, SH, Ch and Z). Use in moderation and you’ll be all set!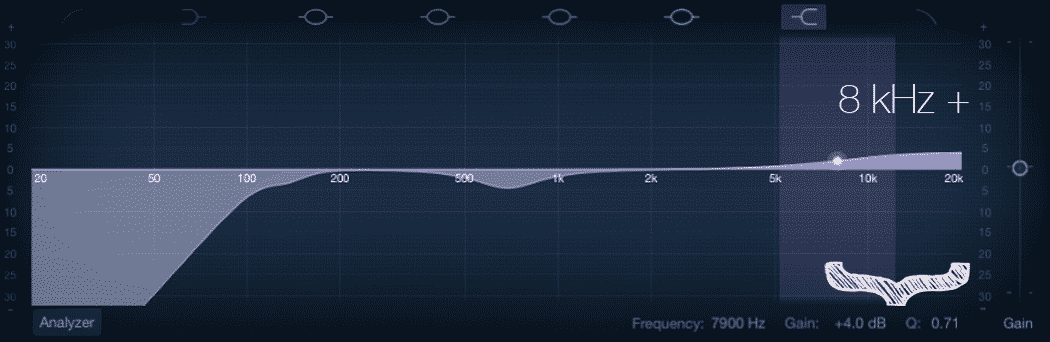
Coming in Part 2
In part 2 of How To Mix Your Vocals In GarageBand i’ll reveal some great Reverb and Panning fundamentals and settings that you can use to really add depth to your GarageBand projects.
I’ll also share some advanced techniques including Pitch Correction how to use GarageBand’s built in AUMatrix Reverb Plug in to produce a modern, ‘in your face’ effect.
Like what you read? You’ll find everything else you need to produce professional quality GarageBand projects by clicking the link below;