In Part 1 of How To Mix Vocals In Garageband, we looked at Compression and EQ ideas as well as some tips to help you get the most of your Vocal tracks. This time round we’ll focus on Reverb, Panning and some more advanced techniques that will take your Vocals to the next level!
Let’s get stuck in…
Reverb
You can go a few ways when adding Reverb to your Vocals. You can add just a little – just enough to color the performance and give it a more polished sound. Or you can go all out and add a lot of Reverb. Used correctly, piling on lots of Reverb can result in a really unique sound, though you need to be careful to keep your Vocals at the forefront of your mix.
Personally, I like keeping things simple and low key on my main Vocal track, maybe adding no more than 10 – 15% of the effect (around the 8 o’clock mark on the Reverb knob).
For backing Vocals or layered Vocals (More on that in the ‘Next Level’ section) you can add much more.
Echo
The same principle applies for Echo – i’d recommend holding off going all out on your main Vocal track (10 – 15% MAX), as this will just sound unfocussed. Instead, add a little – just enough to color the sound and save the dramatic Echo sounds for your backing Vocals (if required).
Panning
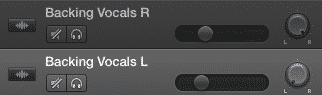
Generally speaking, your main vocal track should sit either dead centre, or very slightly off centre (they can clash with other centrally Panned instruments like the Bass or Drums in crowded mixes).
![]()
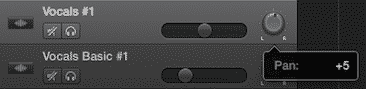
Your backing Vocals and layered Vocals can be Panned much wider. Layered Vocals in particular can really create a feeing of thickness when Panned wide of a centrally aligned main Vocal.
The Next Level
So you’ve recorded your Vocal track, applied Compression, EQ and even added a touch of Reverb.
What now? Well, maybe nothing – how do those Vocals sound in your mix?
Do they sit well with the rest of the instruments and tracks in your project?
Can you clearly hear every word and syllable?
Do your Vocals have enough presence to carry the project?
If you’re happy with them the way they are now – great! If you feel like more could be done to make your Vocals shine – read on!
Pitch Correction
Love it or hate it – Pitch Correction plays a huge role in the production of modern music.
I’m not just referring to the deliberate stylistic ‘cranked right up’ use of it in Pop, R&B and Rap music either. It’s often used in moderation to correct slightly ‘pitchy’ (slightly out of tune) performances or provide an extra layer of sheen to an entire Vocal track.
The decision to use Pitch Correction on your Vocals is entirely down to personal preference.
I do use Pitch Correction – in moderation – on most of my own projects, as I feel it can help tighten up my backing Vocals as well as give my main Vocals more of a professional sound.
Here’s how to set it up:
Click the ‘Editor’ icon (the scissors) in the top corner of the Garageband window.

Make sure you have the track you wish to apply Pitch Correction to selected. There are two menus to choose from here – Track or Region. Selecting Region will allow you to access the ‘Transpose’ slider, but for now choose ‘Track’ (it will open on ‘track’ by default anyway).
On the left of the Editor window, you’ll see the Pitch Correction slider. Under the slider is a ‘limit to key’ check box. This will limit the notes that Garageband’s pitch correction tool will correct to the notes within the key your Garageband project is in (phew).
If you set the key of your project to a particular key when you set it up and you have stuck to that key throughout your entire recording process, then this option can be helpful. If you’re like me however and tend to play it by ear, leaving this option unchecked is fine.
From here, all you have to do is adjust the slider to taste. Here’s what I find works:
Main Vocals
Subtle: 15 – 30
Heavy/Robotic: 60 – 80
Backing Vocals
You can be a little more heavy handed, as they are designed to support and harmonize with your main Vocals.
I find anywhere between 40 – 80 is usually fine, depending on taste.
Matrix Reverb
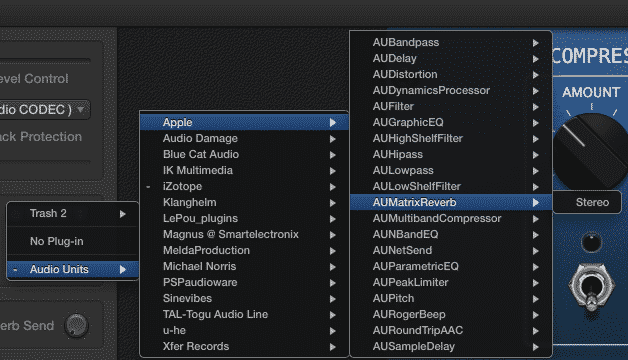
Spending 5 minutes with the Matrix Reverb’s factory presets should be enough to tell you that you can achieve some pretty drastic Reverb effects with it. What might not be quite as apparent is how effective some of it’s subtler applications can be.
One of the most widely used Reverb settings used by professional audio engineers today is known as a ‘Plate’ Reverb. The purpose of a Plate Reverb is to recreate the audio characteristics of artificial techniques from the 60’s and 70’s. It’s a great way to make your Vocals stand out in your mix.
The default factory preset is a little heavy handed for my tastes, so I’ll usually dive into the Matrix Reverb’s settings and tone things down a bit.
I know – the several hundred sliders presented to you on the face of the Matrix Reverb’s interface can be a little unnerving…
Tip: Close all but the top menu by clicking on the small arrows next to each section title! All we’ll need to shape your Vocal sound into something usable is the top set of controls.
Adjusting the Wet/Dry slider to around 10 – 20% will allow the Matrix Reverb plug in to subtly color your Vocals without being overbearing. The small /large mix slider allows you to control the amount of actual Reverb that is applied to your Vocals, but with only 10-20% of the effect being applied anyway, this won’t make mush difference to the overall sound.
Here’s a peek at how i’ve set up The Matrix Reverb plug in for my own Vocals. Experiment with the settings to achieve your desired sound:
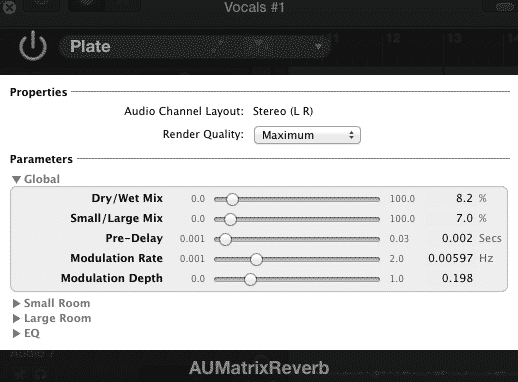 These settings are fairly subtle, designed to color your Vocal sounds without being overbearing.
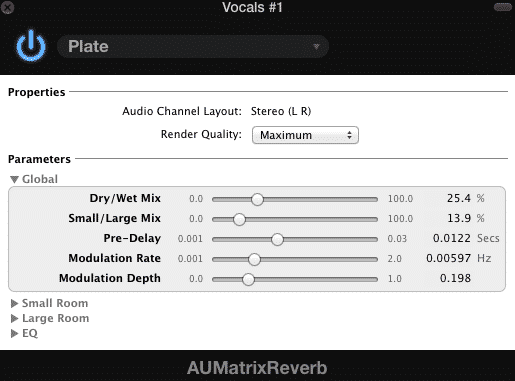
These settings are a bit heavier. They won’t suit every Vocal, but can really help add some distinctiveness to weaker performances.
There you have it. Using the techniques and tips in Part 1 and Part 2 of this guide will definitely help improve the quality of your Garageband vocal tracks.
If you enjoyed this double bill Garageband mixing extravaganza, let me know by sharing it on Facebook/Twitter etc!
This article is an excerpt from my book “The Ultimate Guide To Mixing In Garageband”. You might also want to check it out while you’re here- it’s got everything you need to start producing professional quality projects in Garageband!